- Follow these steps to change your product key in Windows 7. Note: If you bought an edition of Windows 7 other than what's installed on your PC—for example.
- The product key is for an upgrade version of Windows 7 and a previous version of Windows wasn't on your computer when Windows 7 was installed. To install.
Free Anytime Upgrade For Windows 7. How to upgrade from Windows 7 Home basic, Home premium, professional to Ultimate at free. Upgrade Key for.
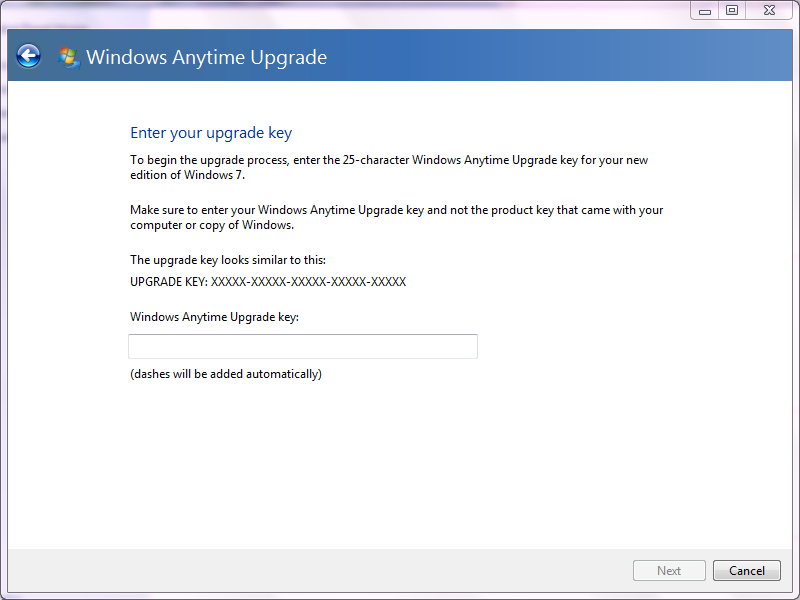
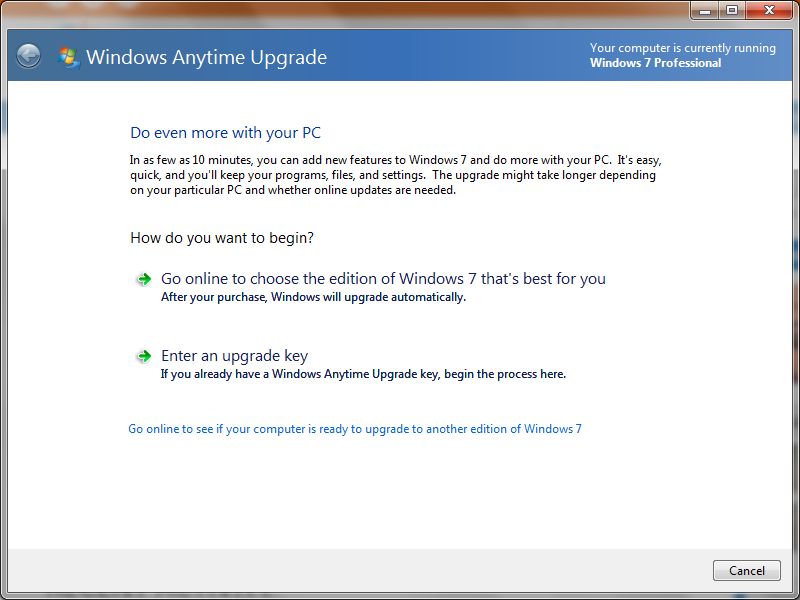
Follow these steps to change your product key in Windows 7. Note: If you bought an edition of Windows 7 other than what's installed on your PC—for example, if you purchased Windows 7 Home Premium, and Windows 7 Ultimate is now installed on your PC—you'll need to perform a custom installation to update your product key. Important: You'll need your new product key to complete the product key update process. For examples of where to find your product key, visit the How To Tell website. Scroll down to the bottom of the window that appears, and then, under Windows activation, click Change product key. If you're prompted for permission to continue the process, click Continue. Follow these steps to change your product key in Windows Vista. Note: If you bought an edition of Windows Vista other than what's installed on your PC—for example, if you purchased Windows Vista Home Premium, and Windows Vista Ultimate is now installed on your PC—you'll need to perform a custom installation to update your product key. Important: You'll need your new product key to complete the product key update process. For examples of where to find your product key, visit the How To Tell website. Scroll down to the bottom of the window that appears, and then, under Windows activation, click Change product key. If you're prompted for permission to continue the process, click Continue. To change your Windows XP product key, you'll need to use the Windows Product Key Update Tool. Before running the tool, read all instructions to make sure that you understand how the tool works and what information is sent to Microsoft as part of the update process. How it works The Windows Product Key Update Tool will make changes to your Windows installation to update your product key. In addition, the tool will scan a number of key Windows files to determine if they have been tampered with. If tampered files are discovered, the Windows Product Key Update Tool will alert you before continuing. What information is collected Using the Windows Product Key Update Tool results in information being sent to Microsoft. The information collected will not be used to identify or contact you. The information sent is standard Windows validation information as well as information related to the file tampering scan. Note: Microsoft recommends creating a system restore point before making any operating system changes. Important: You'll need your 25-digit product key to complete the product key update process. For examples of where to find your product key, visit the How To Tell website. To update your product key Open the Windows Product Key Update Tool. When prompted to run or save the Windows Product Key Update Tool installer, click Run. Follow the instructions in the installer.

This is buying keys, they want to upgrade this : original windows 7 to. Windows allowed the upgrade, but then said the key wasn't valid for.
How much does the upgrade key for windows i need to rrinstall windows Everybody, trying this site aakeys.com, the windows 7 product keys.
Запускаем Windows Anytime Upgrade (WAU). 2. Нас будет приветствовать окно Windows 7 Ultimate OEM:SLP Keys (OEM-8992662).


Вы сможете купить лицензионные ключи для обновления Windows 7, чтобы получить доступ к полным возможностям вашей системы, без.
Free Windows 7 Professional anytime upgrade ( keys) But I got a genuine windows 7 product key from this page not long ago.
This happened to me on the weekend when I opened up my laptop to clean out the dust. I didn't even get to the grub screen - the only signs of life were the LEDs on my keyboard and the fans. After a short panic I opened it up again and realised I hadn't fully re-inserted one of the RAM cards. – craq Aug 4 '14 at 12:20 You can also try acpi = off and nolapic if nomodset also shows up as a black screen. 3. Black screen or "you need to load kernel first" and "can not read file/cd0" errors when installing to an UEFI capable machine: Ubuntu's installer 'when attempting to run in UEFI mode) will hang and stop due to different manufacturer's implementations of the UEFI specification and will hang in different ways. To identify if your machine is booting in installer UEFI mode you will see REF: UEFI Community Ubuntu Documentation Section 2.4 If your machine is CSM capable (which is a full UEFI implementation with an emulated BIOS layer) after selecting any option from the grub list the system will hang at a black screen. The picture above actually only confirms your DVD/USB booted using UEFI and there will be some means in firmware settings to ensure drives are booted in order to make the UEFI installer run (a solution may possibly be as simple as ensuring SATA is set to AHCI) - check your vendors manual! Also check the UEFI Community Documentation Section 2.3 for more details. What you need to do first is to disable SECURE BOOT in the firmware settings. If that does not get the Ubuntu installer running, try disabling anything mentioning UEFI in the firmware settings. Or If you cannot find UEFI settings then enable CSM - this will disable the UEFI booting of the installer and then allow a legacy/BIOS install of Ubuntu. Installing grub-efi afterwards will allow UEFI to be re-enabled. Again refer to UEFI Community Ubuntu Documentation at Section 4 Some machines use a full BIOS with an emulated UEFI layer which may throw errors as described ie "you need to load the kernel first" and "can not read file/cd0" Not all of these machines implement Secure Boot. Simply selecting UEFI in the BIOS settings will configure UEFI mode on hard drives. There is no solution for these errors and the workaround is to disable UEFI to enable the Ubuntu installer to run in legacy mode; after which boot-repair can be used to install grub-efi which then allows/needs UEFI switched back on before Ubuntu will boot using UEFI. Once again refer to the UEFI Community Ubuntu Documentation at Section 4 Black/purple screen after you boot Ubuntu for the first time This usually happens because you have an Nvidia or AMD graphics card, or a laptop with Optimus or switchable/hybrid graphics, and Ubuntu does not have the proprietary drivers installed to allow it to work with these. The solution is to boot Ubuntu once in nomodeset mode (your screen may look weird) to bypass the black screen, download and install the drivers, and then reboot to fix it for ever. Start your computer, and press the Right Shift when booting up, to get the Grub menu. Use the ← ↑ → ↓ keys to navigate/highlight the entry you want (usually the first one). Press e to edit that entry, which will show you the details: Find the linux entry as shown above, use the ← ↑ → ↓ keys to get to it, and then press the End key to get to that line's end (which may be on the next line!). Enter nomodeset as shown, and press Ctrl+X to boot to where you can successfully install your graphics drivers. If you are running Ubuntu 12.04 or 12.10, and have a ATI/AMD graphics card, you have to follow the instructions here, otherwise you will run into this problem every time you restart your computer. LUKS encryption In case you've installed Ubuntu with LUKS encryption / LVM option, it could be that Ubuntu just asks you for your password - and you cannot see it. If you have a purple screen (maybe you need to set the nomodeset-option also?) and you have encrypted your complete Ubuntu installation, try to just type your encryption/LUKS-password after waiting some seconds (or minutes, just to be sure) and continue with a press on Enter. If this is successfull, you should see your Login-screen just a few seconds later. After selecting boot options you have the opportunity to edit the boot flags manually using your keyboard. Replace quiet splash with no splash to get an idea of what step your system is failing at. Using that information search the forums or the internet for answers from the community. If you still can't install Ubuntu then unfortunately you've probably run into a hardware specific bug, please see here: How do I report a bug? I had this problem last night. All of a sudden my system wouldn't boot up anymore. BIOS check would finish, then it would just hang there on a black screen with the cursor flashing. Left it there for several hours just in case. When that didn't work, I unplugged all my USB devices and all of a sudden it booted up fine again. I haven't narrowed it down exactly, but in my case it was either my USB hub or the iPod plugged into that USB hub that was causing it to hang. Not saying this is necessarily the problem you're having, but hope your boot problem is as easy to fix as unplugging some USB devices...! Normal mode Safe graphic mode ACPI workarounds Verbose mode Demo mode Ignore Safe graphic mode as it applied to Ubuntu in 2008 and does nothing for the modern nvidia/radeon issue. Place your cursor on Normal mode and press E. Then edit the entry and insert nomodeset as shown here (look for it between noprompt and quiet splash in the middle; note there may be some other differences but don't change anything else - just add nomodeset): linux /ubuntu/install/boot/vmlinuz debian-installer/custom-installation=/ubuntu/install/custom-installation iso-scan/filename=/ubuntu/install/installation.iso automatic-ubiquity noprompt nomodeset quiet splash boot=casper ro debian-installer/locale=en_US.UTF-8 console-setup/layoutcode=us console-setup/variantcode= -- rootflags-syncio initrd /ubuntu/install/boot/initrd.lz Now press Ctrl+X to boot. NOTE: This only applies to the Installation; the next time you boot you have to override it again, and for this it will be the same as for a normal install (answered above). Make sure you hold Shift to make the Grub menu show though. Method 2 When you run wubi.exe standalone and install Ubuntu (not a sub-flavour), it downloads a pre-installed, compressed disk image with a default Ubuntu install, and then decompresses this to the size of the virtual disk. There is no grub.cfg setup yet so it uses the file \\ubuntu\\install\\wubildr-disk.cfg for the first boot which you can edit and add nomodeset: loopback loop0 /ubuntu/disks/root.disk set root=(loop0) search --set=diskroot -f -n /ubuntu/disks/root.disk probe --set=diskuuid -u $diskroot linux /vmlinuz root=UUID=$diskuuid loop=/ubuntu/disks/root.disk preseed/file=/ubuntu/install/preseed.cfg wubi-diskimage ro quiet splash nomodeset initrd /initrd.img boot Note - if you've come to this thread after booting for the first time, it's possible that the grub.cfg has already been created (even if it froze up). In this case, editing the \\ubuntu\\install\\wubildr-disk.cfg file will do nothing - it always checks for /boot/grub/grub.cfg inside the virtual disk first. So you should follow the instructions for the normal install above. Note also that the Grub Menu is suppressed by default on Wubi installs (even though there are two operating systems - because you boot Ubuntu from Windows, and therefore adding a Windows entry from Ubuntu's Grub Menu makes no sense) so you have to press and hold the Shift key after selecting Ubuntu in order to display the Grub Menu. On Windows 8, it reboots after you elect to boot into Wubi, in which case, you should hold the Shift key after the BIOS posts. (This is only for Windows 8 with BIOS - Wubi doesn't work with UEFI). When booting press the ESC Key or leave the SHIFT key pressed until the GRUB menu appears. In the GRUB menu select the RECOVERY MODE. It should say something like: Ubuntu, with Linux 3.2.0-25-generic-pae (recovery mode) After the recovery mode finishes loading, it should present you with a menu. Select the option about going to the shell with root access (root Option. Last option in the image below) Now we need to install the Nvidia drivers and update the system. Follow the next lines step by step to do this in the correct order. Also make sure you are connected to the Internet: A. Updating System The Default Ubuntu Way involves just typing in the terminal sudo apt-get install nvidia-current (For the current normal drivers) or sudo apt-get install nvidia-current-updates (For the latest current drivers). Just pick one. the PPA way has the Latest bleeding bloody edge drivers. I mention this one since I am testing it in some use cases that relate to problems using TVs and 16:9/16:10 resolutions. To install this one do this: sudo add-apt-repository ppa:ubuntu-x-swat/x-updates and press ENTER to accept a message you will receive. Then do sudo apt-get update. Lastly do sudo apt-get install nvidia-current. Note that you can not mix this one with the Ubuntu way. One will overwrite the other one. Now if you happen to have any problems do the following via the terminal again but this time go to your home folder. In my case it is /home/cyrex, so I would cd /home/cyrex. In your case you should change that to your user and the apply the following: sudo rm -fr ./config/monitors.xml sudo rm -fr .nv* sudo rm -fr /etc/X11/xorg.conf Then when you boot into Ubuntu change the resolution via the Displays option in the Ubuntu Settings Menu (The cog in the upper right corner) What we did there was remove the monitors.xml to solve some resolution problems, remove the .nvidia-settings to fix some Nvidia config problems and remove the xorg.conf (Which is not really needed in the latest Ubuntu versions) to remove any badly configured options. Lastly we can execute the grub option in the recovery menu to fix any bootloader issues. I also had this problem, or a similar one. It turned out that, for some reason, Ubuntu had started with the screen brightness on its lowest setting. If I went into a very dark room, I could see the screen just well enough to go to the "Brightness and Lock" control panel and turn the brightness up to where it should be. I realize this is an old question, but it's also pretty general without any details about the specific hardware involved. That said, you can't file a bug or go about fixing things until you figure out some more details. I thought I'd take a stab at this since I faced the issue and recovered from it pretty recently. I'll probably run through here again later and throw in some more info and simplify the steps, but the answer list is already pretty big, so I'll go easy on the screenshots. Recovery mode is your friend, but you don't always need a single-user root session to solve things. In fact, you might just be able to do a normal console login by selecting "resume" without considering any of the other options on the recovery menu. The nice thing about a normal console session over the single-user root mode is that you can get multiple terminals running at once--Switch between them or open up new ones with Alt+F1, Alt+F2, etc. There's a good chance that it's a video driver issue which is preventing you from going into the graphical login, and it might just be a result of some upgrade you did before rebooting the computer. You might go a couple of years at a time without experiencing similar issues, but it's a good idea to know your hardware and to be prepared to use the terminal. Basically there are two video drivers to worry about: the kernel driver and the xorg driver. Xorg is a video server that uses the x11 protocol to display things in full color with depth and all kinds of crazy effects--It's an abstraction layer between applications like the desktop environment or windowing managers and the kernel driver. The kernel driver is yet another abstraction layer, but it's a bit closer to communicating with the actual hardware. It's the kernel's job (in this case, Linux) to pass messages between applications and the hardware. The drivers can either be compiled into the kernel or added in a more ad hoc way through kernel modules. Probably you're using modules unless you configured and compiled your own custom kernel. The kernel driver as a module gets loaded shortly after you boot up, which allows for easier upgrades when you power down to swap out a card. The good news is that there are some more or less standard tools that you can run from the command line to give you more information about those kinds of drivers, the actual hardware and whether they're loading: lspci, dmidecode and dmesg, to name a few. There are man pages (e.g., $man dmidecode) and many howtos on those kinds of tools, so I won't go into too much detail here for now. Then there are the xorg drivers. To list what's available in the repositories, you might type apt-cache search xserver-xorg-video | less to give you a list of all possible drivers. Piping it to less with the '|' symbol which you can probably type by tapping the slash key while holding down shift (to be clear on what symbol this is), gives you the option to scroll back and forth through the list of drivers (with the arrow keys). To get more info on a specific driver, you might type apt-cache show xserver-xorg-video-vesa (to pick one at random). To install one, you could type apt-get install xserver-xorg-video-vesa and hope for the best. As of I don't know how many versions ago Xorg will try to load one of the installed drivers for you automatically, but under certain conditions you might have a configuration file lingering around in /etc/X11 called xorg.conf. So take a look and see if there's one there: ls /etc/X11/xorg.conf If you upgraded an Xorg driver without directly upgrading Xorg itself, there's a chance that reverting to the old driver via apt-get install will not automatically pull in the version of Xorg that it's compatible with--It should but apt doesn't always do what it should. Minimally, you'll need a matching version of xserver-xorg-core. Don't bother with uninstalling the upgraded xorg replacement though, just enter the command apt-get install xserver-xorg-core to revert back and uninstall the newer version automatically. This advice applies mostly to transitional renamed packages which provide virtual packages to replace ones that are still being maintained in the same branch of the package tree. Virtual packages are sometimes a mess and can do funny things with any of a number of dependencies which are getting swapped around in the upgrade/downgrade process, but concentrate on getting back to the GUI first. Now that I've given an overview of some directions to start with troubleshooting, let's get back to the console screen that you hopefully pulled off without a hitch from choosing "resume" at the recovery menu. It's a pain to be stuck without a mouse at the console when you've got a lot of copying and pasting to do, so prepare yourself with some gpm for mouse support and some other tools: links/links2 or w3m (web browsers), vim (text editor), dpkg, apt, less (vim style keys and searching like man), and grep. I'm probably leaving a few out. Some particularly useful commands for dpkg are dpkg -L to show files for packages that are already installed and dpkg -l | less to show all packages which are currently installed (piped to less).Sometimes gpm is a little finicky about letting you select things, so you can restart it with /etc/init.d/gpm restart but you might have problems with clicking on links in a page before you restart w3m or the browser links. w3m is a little easier to scroll around and generally better for authenticated sessions (e.g., logging into forums for help). It takes a bit of getting used to hitting the Esc key to click on links (the hyperlinks) though, and the learning curve is a bit steeper than with the browser known as links. Unless you've got an Nvidia card or something with proprietary driver support for linux that you want to try, I'd shy away from kernel drivers before trying things with xorg--Try troubleshooting the xorg drivers first because it can be a lot easier than customizing a kernel for hardware (depending on the brand). The thing is that you might wind up following a series of links that lead you in the wrong direction, with chip makers sending you to the card makers and card makers giving you no support. As for trying out different kernels for different "vanilla" versions of the driver, stick with kernel versions that aren't far off from your current one (given by uname -r) unless you're really interested in testing. There's a pretty good chance that the latest mainstream kernel won't even boot up on your system, so why bother if you're stuck with a half-way broken setup? Keep focused on doing the bare minimum that it takes to get back up again so you're not falling behind on too much work. You can type things up in emacs, vim or pico/nano or check your email in mutt or pine, but eventually you'll want to come back to the 21st century. Good luck! If Ubuntu 10.04 booted, but not 10.10 or newer versions booted Chances are your computer's ACPI is not supported. Ubuntu 10.04 supported drivers for the ACPI, but dropped supported for that since 10.10. To try that, change the BootOptions to nolapic and see if the Ubuntu Live CD boots (info). If it worked, you have 2 options to make the LiveCD boot: In case that the black screen is only intermittent (and that there might be a blinking cursor), lightgdm having a race condition and not being able to start properly could be the issue. At least that was the case for me. See here for a solution: http://www.webupd8.org/2013/01/ubuntu-lightdm-black-screen-when-using.html (see also this bug report). The gist of it: Use gdm and not lightgdm (i.e. sudo apt-get install gdm, and choose gdm as default login manager when asked). Let me quickly describe the symptoms I had: At first, because also the graphics was having a problem, when this problem occurred, I would only see a blank screen, and no chance to switch to the other terminals by pressing Ctrl+Alt+F1-6 (the screen simply stayed completely black, or rather, a very dark purple or something). This I fixed by adding the "nomodeset" kernel option, as stated e.g. in this answer. But after that, I still intermittently couldn't boot up properly; now it would stop with a blinking cursor. And this, as the above link tells in more detail, is caused by lightdm having a race condition - which manifests itself mainly if the boot-up is very quick, e.g. from an SSD (as it is the case for me). Hope this helps someone. Procedure Once you are in the recovery menu, select Activate Networking. Now select drop to a root shell. Run mount -a. (In my case that bad was the installation that I was forced to do this) Verify that your network is up and running: ping -c 2 4.2.2.2 If this fails run dhclient. ping -c google.com if this fails run dhclient. Now update your repositories: apt-get update Install debsums: apt-get install debsums Run debsums -s. It will give you a list of packages that have problems. Take note of each. Now reinstall the packages that has problems: apt-get --reinstall install packages. Update your grub just in case. update-grub. Reboot and good luck. After upgrading from 12.10 to 13.04, the login screen is black because brightness is set to lowest level (Intel Integrated Graphics) I've noticed that it would be a brightness problem cause I've listened to the Ubuntu's default drum sound when booting for the first time after upgrading. Before I find this solution, I had to increase the brightness level to see anything on the screen. For me, the solution came from this bug report at https://bugs.launchpad.net/ubuntu/+source/xserver-xorg-video-intel/+bug/1173059, by changing /etc/default/grub as root this way: Make a backup file, so you'll be able to restore it, if this solution doesn't work:
 RSS Feed
